Where do you go climbing in Europe the summer, when accelerating warming has made even Céüse too hot? Even higher altitude might be the only answer.
After checking forecasts for various regions of the alps we decided to go to Cerces for some alpine/multipitch sport climbing. The Cerces massive strides the Savoie and Haut-Alpes departements. The massive has a smattering of peaks and walls with equipped, semi-equipped and traditional routes. Among the most popular are Tête de Colombe, Aiguillette du Lauzet, Tour Termier, Pic de l'Aigle... etc.
We rented an apartment in nearby Monêtier-les-Bains, which was still relatively affordable in July.
The part of Cerces that lies in Haute-Alpes is covered by the guidebook Oisans nouveau, Oisans savage - livre est and some of the popular routes are also covered by volume 1 & 2 of Mussatto's Itineraire d'un grimpeur gaté. (Alas, volume 1 is out of print, but surely everyone already has it?)
Anyway, we did a few routes on Tour Termier and Pic de l'Aigle, during a period when most of the Mediterranean Europe suffered one of it's now annual once-in-a-lifetime heatwaves. Despite this we could climb on south- or south-west facing rock at above 2600 m.
Tour Termier
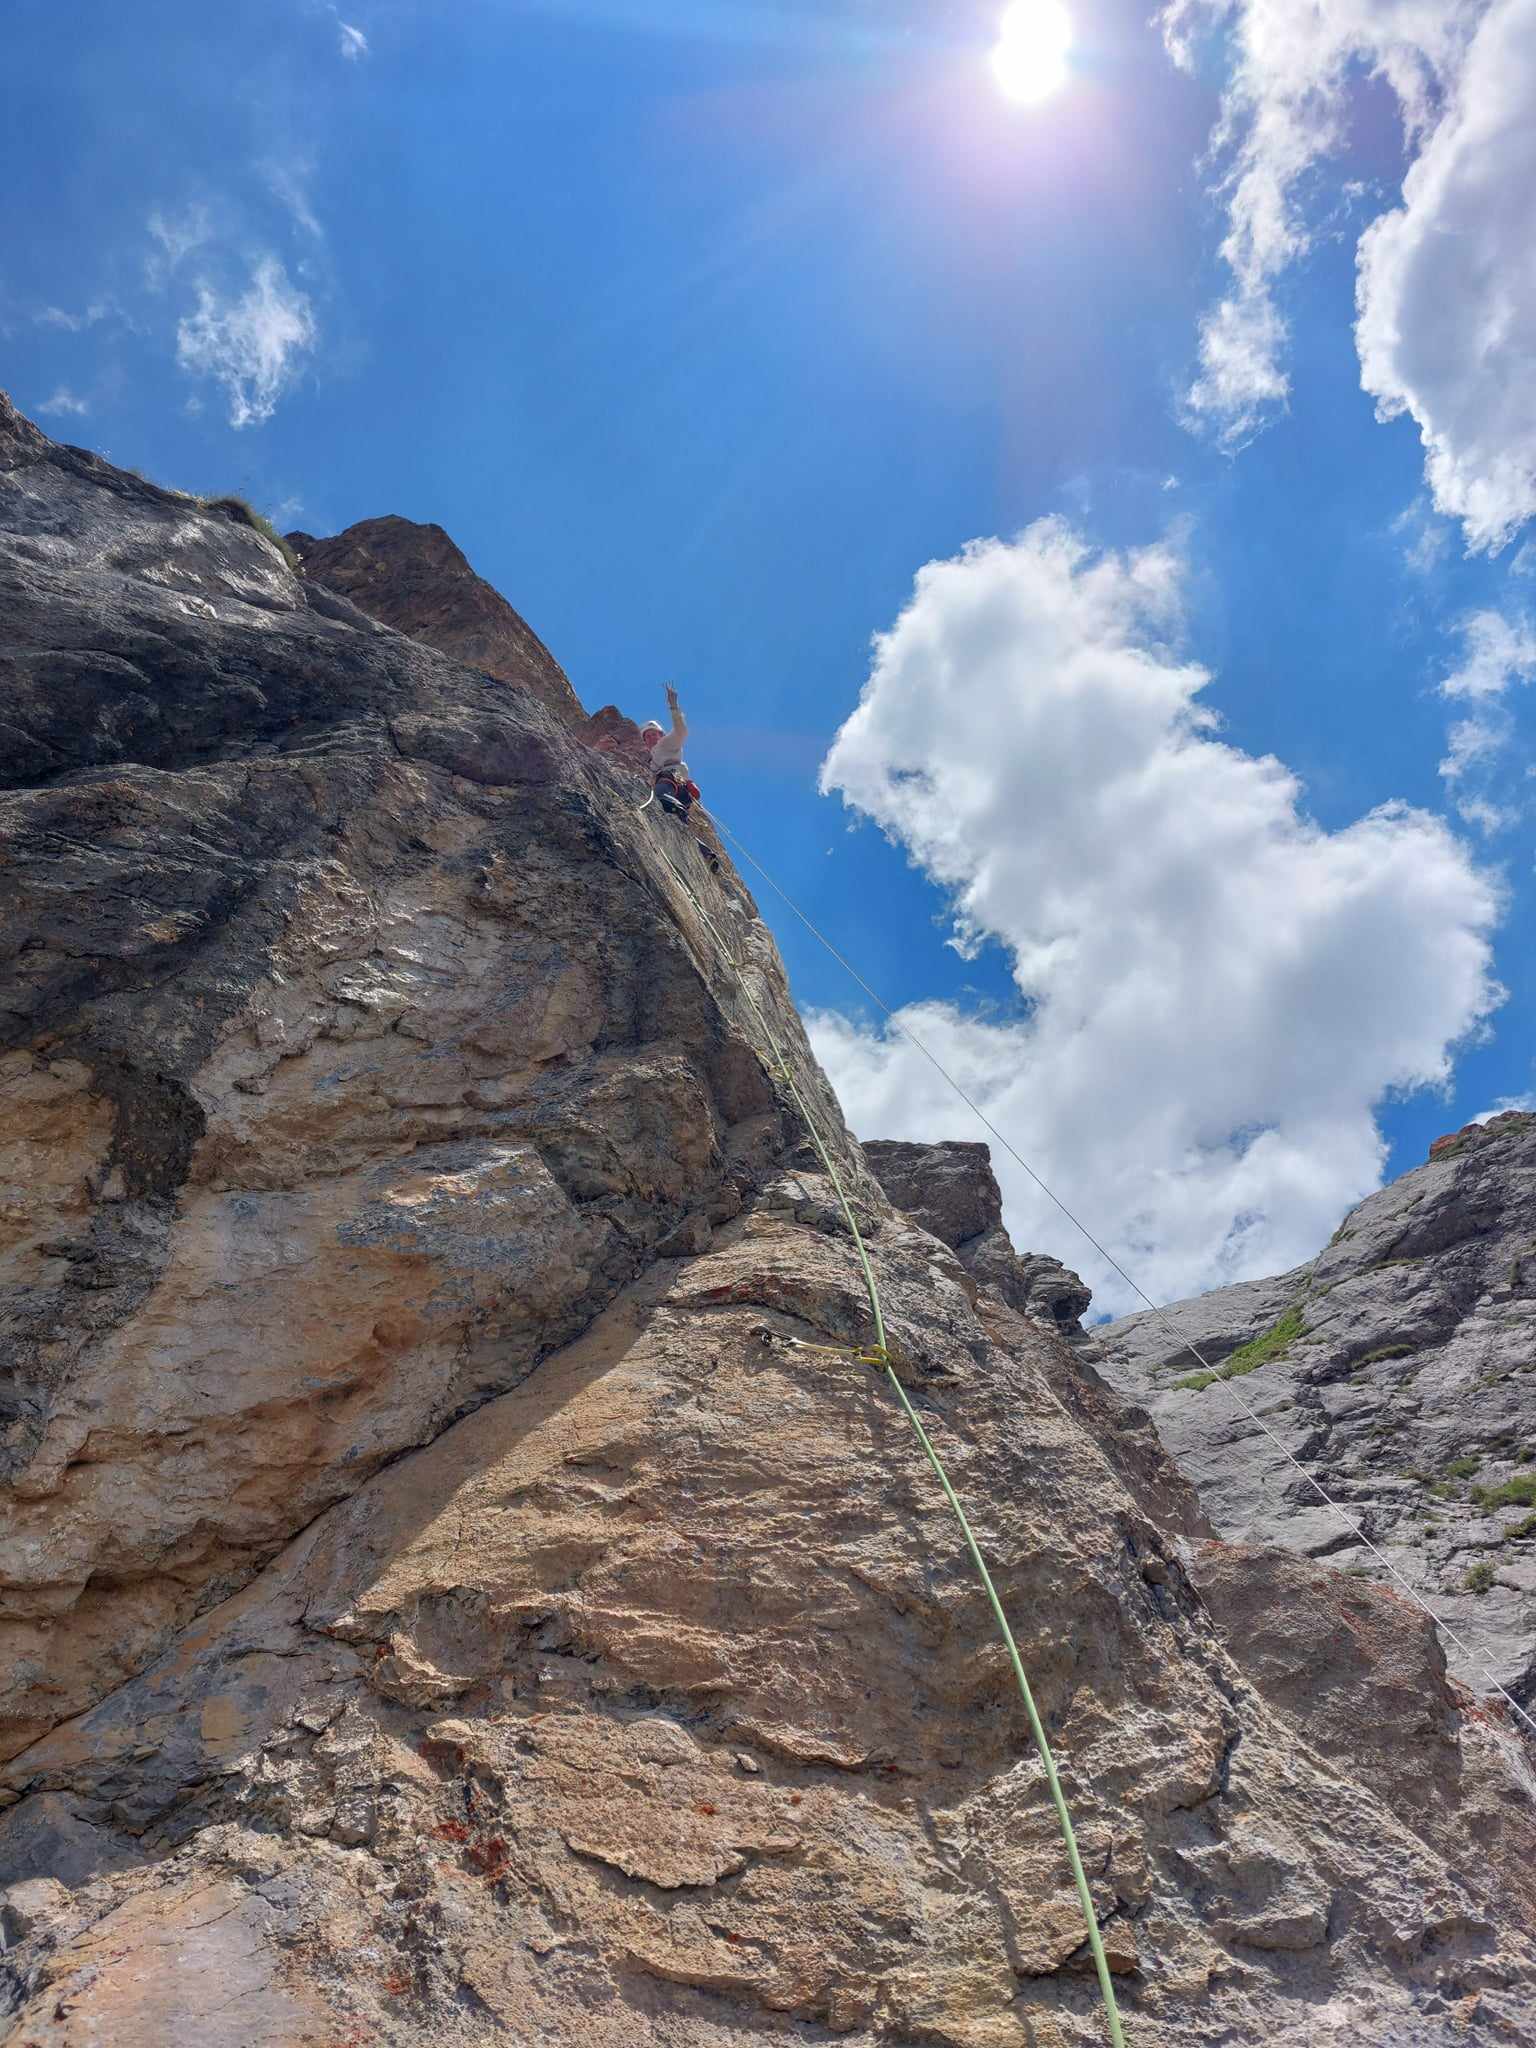
For the area, the routes on Tour Termier offer a relatively quick and easy approach and a reasonable decent. There are more than 15 fully bolted routes and a handful of tradroutes on the wall. The routes we did were bolted closer to sport-climbing multi-pitch style than in the alpine style. Prepare for the hordes on sunny summer days! It is not yet Chamonix, but there will be several teams on the wall and maybe on your route. On the first route we did, the very popular Feu sacré (TD+ 7a>6a), we got stuck behind a really slow team of three that would not let us pass.
The base of the routes is at 2750-2800 m and the top at around 3010-3070 m. Most routes are in the shade until mid-day in the summer and a cold wind is often blowing across the col, so best climbed on warm summer days.
The most popular routes seems to be Pontant neuf (TD 6a+>6a) Boucs en stocks (TD 6b+>6a+), Marmotta Impazzita(TD+ 6c>6b) and the previously mentioned Feu sacré (TD+ 7a>6a). All of these will have one or several teams on them a sunny weekend in the summerm and every sunny day in August. In fact, when we climbed L’usure du temps even half of the routes with mandatory 7a had teams on them.
Approach notes: Parking at 45.0604, 6.4117 on the big parking one hairpin below the monument to Henri Desgrange, just south of Col du Galibier. Take the path towards south-east starting across the road from the parking. The pylon mentioned in various guides does no longer exist. Follow the path which keeps more or less same altitude for 40 min and then ascend the scree slope for about 20 minutes to the base of the wall. Total time about an hour for a couple of unfit and overworked office dwellers.
Guidebooks: Oisans nouveau, Oisans sauvage, livre est is an almost complete guidebook to the alpine and multipitch climbing in the area. The topos in this book look like they have been scanned from low-resolution and out-of-focus photos laser-printed sometime in the early 00s. The guidebook gives a good overview of the area but on a first visit needs to be complemented with some proper line-drawings or good photo topos sourced elsewhere.
 |
| French climber on our heels on Feu Sacre |
It is really a pity that the production quality of the topos is sub-standard in this guidebook, because otherwise the book is amazing. Garnished with interesting history, fantastic anecdotes and dry, wonderful humour in the clear descriptions, the guidebook is a true pleasure to browse. Two examples from descriptions of descents: ‘descent by foot is the solution if you do not want to die rappelling’ or ‘down on right via ledges and ridges, not simplissimo, is faster but reserved for real mountaineers (who die, sometimes, in very stupid ways…)’.
Ici mieux qu’en face ED+ 7b>7a
 |
| Manu and partner on pitch 9 of Ici mieu qu'en face |
The route is in the shade until 1pm daylight savings time.
We thought that this route was quite a bit better than the very well-known and highly popular classic Feu Sacre (TD+ 7a>6a), so if you’ve done that for warm-up and is a bit disheartened rest assure that Ici mieux… is indeed better, with mostly very high-quality rock. An old climbing partner of J., and one of Grenoble’s most legendary rock-rats count this as the best route in Cerces. Pitches 5, 8, 9, and 10 are particularly good and pitch 3, 6 and 11 also offer good climbing. Most pitches are short and many of them can be combined. P1-2, P4-5 (watch drag!), P6-7 and P10-11 can be combined.
 |
| J. happy on top rope above the crux |
We hauled a small bag. On pitch 4 we hauled to the last bolt before the traverse, then carried the bag across the ledge, otherwise the hauling was unproblematic.
We used the photo-topo on camp-to-camp which was actually legible.
https://www.camptocamp.org/routes/175360/fr/tour-termier-ici-mieux-qu-en-face
The route should be avoided after rainfall as pitch eight crosses a big run-off. An escape down the route is probably rather involved after pitch eight.
Gear: 14 draws + gear for belays. No long draws needed unless you want to combine pitches.
P1. 6b+ 20m. Short pitch with a dangerously high first bolt. Tricky slab climbing. Can be avoided by walking up the ledge on left.
P2. 7a+? 30m. More tricky slab climbing. Small holds and hard to read if not chalked up. A tattered ‘chasse-d’eau’ (long fixed tat) hung from the dihedral at the end, and without this the very touch-and-go move (7a) to enter the dihedral would be well mandatory.
P3. 6b/c 35m. Somewhat spaced bolts leads slightly to the left. Nice pitch, quite sustained.
 |
| J. on pitch 3 |
P4. 7a 30m. Short pitch with a one-move wonder that felt much easier than anything on P2 leads up to the ledge. Traverse the ledge 10m to the left to a bolted belay shared with two other routes. We hauled to the bolt just before the ledge, then our second carried the bag across the ledge.
P5. 5c 20m. Climb straight up above the belay. Daisy Chienne parts left and En shorts… to the right. Nice pitch!
P6. 6c+ 30m. Climb the dihedral (far to the first bolt) up to a small roof and pull this with increasing difficulties and air under the feet. Great position. Semi-hanging belay in a small niche.
P7. 6b 15m. Straight up for a few meters. Then left to a belay just before the big traverse left on P8.
P8. 7b 30m. Traverse left with lots of air beneath, then straight up the overhanging grey streak on side-pulls with a million bolts. I did not understand how to pass the last bolt (maybe due to dirt on the rock to the right from the run-off?) and dynoed from the draw to a sloper, followed by some tricky and very mandatory runout 7a climbing to the belay. Great but committing pitch! Semi-hanging belay on a small foot-ledge.
 |
| Me on pitch 8 |
P9. 6c+ 25m. Very sustained slightly overhanging climbing on mostly good holds. Amazing.
P10. 7a 25m. Beautiful blue limestone slab with some quite technical moves. The last bolt is a spinner that sticks out an inch which did not inspire too much confidence (in retrospect I think it is good enough) for the tricky crux up to the anchor. Must be 6c+ mandatory or so?
 |
| J. follows P10 |
P11. 6c+ 25m. A hard, and morpho (or so my partner claims), move between the 1st and 2nd bolt then a bit easier, then much easier up runnels (5a) to a belay up and to the right. The belay is hidden about 5m above the last bolt and maybe 2-3m to the right, in a somewhat uncomfortable spot, but making hauling easier.
P11+ 3c 30m. Traverse straight right from the belay and pass in front of the phallus (one bolt) past a cairn to the rappel anchor.
From here we were a bit lost, apparently it should be possible to keep traversing straight right, but we kept scrambling straight up two more pitches of Termier-tière (3b) before spotting and following cairns down and to the right to Col Termier. The path down from the col is steep and some of the scree is loose, so be careful to follow the cairns.
I would not use the rappel if I wasn’t sure that there are no parties below. I think it is asocial to rappel across ledges with loose rock unless the decent down the col has too much snow to be safely traversed.
 |
| Descent |
L’Usure du Temps ED 7b/A0>6c (or 7c>6c)
The route is in the shade until about 1pm. Hauling a small bag OK. On pitch 3 we tensioned the haulbag from below to make sure it did not swing into and dislodged loose rock, on P1 and P4 we only hauled up to the ledge, not across, for the same reason. Otherwise easy hauling.
This was the best route we did on Tour Termier, and quite possible during our entire summer vacation! High quality rock through, with good friction. All pitches were good.
P1. 6a+ 25m. One tricky slab-move. Belay on the huge ledge.
P2. 6b+ 30m. Sustained climbing with one trickier sequence. Good rock.
P3. 7b 35m. Rising traverse left (1st bolt a bit high) with increasing difficulties to a short crux on small holds. Tricky clip (safe to skip), then easier. Very good climbing.
 |
| J. on pitch 3 |
P4. 6a 30m. Excellent climbing on flakes. Belay on top of a ledge with lots of loose rock.
P5. 7a 40m. Up and right across a bulge, then up the right side of a pillar with a thin hard section in a corner. Put in some long slings on the first bolts to lessen drag. Excellent pitch.
P6. 7b+/c or 7a+ A0 or 7a A0. Excellent steep climbing up and to the left (about 6c/7a) up to a section with four, three, two or no bolts of aid climbing. The crux is hard to read and uses a small somewhat hidden hold. 7b+ to 7c+ depending on stature. 6c mandatory above the aid-sequence. DO NOT STOP AT THE FIRST BELAY TO THE LEFT. Keep climbing two more bolts up to a belay (non-connected bolts). Excellent pitch.
P7. 6a+ 30m. Traverse low straight out right to the first bolt (a bit far), then up average quality rock for three bolts, past the rappel anchor for the decent and continue up the corner another 20m on good rock and somewhat spaced bolts. Good pitch.
P8. 6c 45m. Straight up a hard section, with a ≈6c mandatory section between the 2nd and 3rd bolt to easy (≈6a) climbing to a belay up and slightly to the right on the slab. (I think? There are many routes converging toward this point, and I was not sure which belay was the best choice).
P9. 3b/5b? 60m. We climbed straight up the slab from the belay. Camp to camp says 5b but we climbed some 3c terrain up and then to the right. One bolt. Anyway, easy scramble. Rope hardly necessary for anyone having topped out L’Usure. Joined some sparsely bolted 3b climbing and some intermediate belay on one of the routes coming from the right.
Descent down cairns towards Col Termier, the cairns and painted black circles down the Col on a steep path. Some loose scree so take care!
We started climbing fairly early in the morning to avoid having to climb P3 in the sun. As there was a fresh breeze all day, it never really got warm despite the continuing oppressing heat-wave over the continent. For once, I did not have enough clothes really.
Pitch 1 had a very curious crux which felt hard with cold fingers in the morning. Pitch 2, which J. lead felt hard for me, but J. said it was fine, so I have to trust her on that.
I managed to onsight P3, partly thanks to some chalk left on the holds by previous parties, and despite this having a very hard clip on top (probably because it was bolted on lead for aid-climbing purposes).
After P4 we switched leaders so that J. would have the chance of leading P5, which I have gathered was excellent and very thin: right up her alley. J. did short work of this pitch while I, as usual, struggled on second.
 |
J. showing mountain skills on the amazing pitch 5
|
On P6 I managed to onsight my way half through the crux, but hanging in draws on the aid-section and figuring out the moves holding on to some pretty abysmal holds was beyond me. If I was better at skipping bolts in airy positions maybe… Something to work on!
When reading descriptions online, there are some disagreements on how difficult P6 is to climb in free. After hanging, I tried a few sequences and I am pretty sure the disagreement depends on what foothold people can use on the last move. For those who can keep their foot low, it should not be quite a bit easier. So 7b+ to 7c depending on stature seems fair. There is also disagreement on how hard the climbing is up to the aid-bit, if aiding, which is of course entirely depending on where you start to aid! All this discussion makes this pitch sounds like it is shit, but it is excellent, regardless of where you start to aid or if you do it all in free. The crux is fun as well, even if it is tricky to figure out on the fly.
On the slab just above the crux on P6 there is a mandatory move to do, unless I made another reading mistake. Sadly, the Gary Gibson of French multi-pitch climbing has put in a belay on one of his squeeze-jobs just below the proper belay of this route. Me, being a bit sloppy did not read the descriptions and used this belay, making the next pitch unnecessarily cumbersome to lead for my better half. Sorry.
The start of P7 has one of the few sections of non-excellent rock on the entire route, but after a traverse out right the climbing up the corner above has some of the best and most interesting rock on the entire route.
P8 starts with a very cool sequence of steep, mandatory, sustained climbing for some ten meters, followed by a long passage of easy climbing on varied rock quality up to the slabs on top.
We had no topo for the final pitch, as the photo-topo was taken from below and the rim of the wall hides the slabs on top. The only indication in the written explanation on C2C was ‘5b’. We did not find any grade 5 climbing. J. climbed straight up on runnels at around grade 3, past a bolt some 15m above the belay, then up and to the right to a belay on scrambling terrain. Just as when we did Ici mieux qu’en face we unroped there and scrambled up past one or two more bolts before climbing down towards the col (cairns). It would have been quicker and just as safe to unrope already on top of P8 (the rock is super solid and have high friction: a fall is impossible to imagine).
I did not see the top of the rap route, but based on the rap anchor I spotted on the right of P8 I’d guess you could rap diagonally skier’s left from top of P8. I would strongly discourage anyone from rapping down this face though. There are loose rock on all ledges and many climbers on easy routes in the fall zone, as well as many hikers without helmets on the path close to the base. In the off-season, when there is lots of snow on the descent downh the Col, I can accept rappelling but otherwise I think rappelling down this face is a deeply asocial behaviour.
Pic de l’Aigle
Pic de l’Aigle’s west facing wall forms a beautiful steep orange triangle. The peak is found just south of Col du Galibier. For one reason or another this wall was mostly ignored until the late 90s. However, the last fifteen years have seen quite a bit of development and now there are a good dozen alpine sport routes and a small handful of trad routes in grades from 6c to 8a. Even though the approach is short, the decent easy and the climbing great, it sees a lot less traffic than Tour Termier. Probably because there are no easy routes really, the bolting is often more alpine than sporty and the rock is sharp enough that having a bit of margin on the grades is a good thing.
 |
| Pic de l'Aigle in its pyramide shaped glory |
Guidebook: Just 20 min north of the Col du Galibier, still in the Cerces massive, Pic de l’Aigle is not covered by the Oisans guidebook. In fact, I am not aware of any guidebook which cover all routes on Pic de l’Aigle. Mussatto’s select guidebooks Itinéraires d’un grimpeur gâte (volume 1 & 2) cover between them six of the routes on the face. Be advised that the second volume does not include approach descriptions neither for this area nor for any areas already described in the first volume!

Approach: Drive to Plan Lachat just north of Col du Galibier. Take the dirt road just north of the huge Parking du trois Lacs up to Les Mottets. Park before the barrier across the military road at coordinates 45.0829, 6.4537. (Do not drive up the military road even if the barrier is open, the military might close the barrier at any time! And lock it with a sturdy padlock.) From the parking at Les Mottets walk up the military road, preferably taking shortcuts across the hairpins for quicker approach up to Refuge des Rochilles. About 35 min from the parking to the army barracks.
At the army barracks walk across the creek and up steep scree to the foot of the crag where a path along the base leads you to the routes. Depending on which route you climb it’s about 10-15 min from the barracks to the foot of the route. Or ‘5 minutes’ according to some apparently quite fit people.
Alternative approach: If the dirt road is too damaged for your vehicle, or you just adore hiking, leave your car at the big Parking at Plan Lachat (45.0902, 6.4362). Hike up the valley towards Rochilles and branch off left on the direct path (signposted towards Rochilles). Count on about 50 min from Plan Lachat to the army barracks.
In the summer of 2024, I could drive up to Mottets with a Toyota Yaris with slightly tired suspension. I cannot guarantee that I would’ve been able to after heavy rainfall.
Maelstrom ED- 7a>6b
A photo-topo of the route as well as pitch-by-pitch description can be found via camp-to-camp. The first ascensionst, Jean-Charles Deleglise, has produced a pdf-topo of three routes he established including Maëlstrom. The pdf also covers the easiest route on the wall, Le fil du temps TD 6b>6a on the nice-looking wall in the back of the steep elevator shaft on the right.
The base of the route is at 2490 m and the top-out is at around 2700 m asl. The route is in the shade until 1 pm daylight savings time, a cold wind is often blowing across the col, and clouds often move in even on the sunniest days, so best climbed on warm clear summer days.
This route aims for the secondary pillar on the right side of Pic de l’Aigle. The first two pitches are of moderate interest, making the route look unimpressive from below. From the second pitch onwards the route offers great climbing on good rock with a spectacular finish up a steep pillar.
We hauled a small bag. On pitch 1 and 3 the bag got stuck and had to be dislodged by the second. On pitch 4 we hauled to an intermediate point on the finishing traverse to avoid getting the haulbag stuck in the big dihedral on the right, otherwise the hauling was OK. I would still recommend climbing with shoes and water clipped to the harness instead.
Escaping down the route should be fine. All belays were connected for rappel but were not equipped with quick-link or a biner, so be prepared to leave gear if so.
Descent: Easy descent across grass slopes on the back of the wall, down towards a lake and then back to the army barracks.
Gear: 12-13 draws + gear for belays
P1. 6a 35m. The name of the route is written at the base. A broken crack with lots of holds straight up to a belay on the ledge.
P2. 3 25m. Traverse left past a bolt on a grassy ledge with plenty of loose rock. Belay on the left edge.
P3. 6b 40m. Straight up from the belay on easy terrain. Soon the climbing becomes technical and a bit runout. Very nice slab climbing on great grey alpine limestone. Our haulbag got stuck a bit to right of the route, seconding, I traversed out to dislodge it and managed to dislodge a 50 kg flake. Grâce à Dieu, no one was below us.
 |
| Pitch 3. Halfway up it gets better, then good rock all the way to the top of the pillar above J. |
P4. 6b/c 40m. Slightly up and to the right (up to the left is another route/project). The climbing is even more technical and demanding than on the previous pitch and requires determination on the runouts in the first half. An extremely well-protected traverse on a smooth low-angle slab leads to the belay at the base of the pillar. A superb pitch on fantastic rock. 6b mandatory and well above the bolt.
 |
| The devil's dance floor. I hauled to an intermediate point to avoid dragging the bag up a gully to the right of the climbing |
P5. 6c+ 20m. Straight up the slightly overhanging arete using some average-sized crimps, then easier to the belay. Another superb pitch.
 |
| Slightly overhanging start of Pitch 5 |
P6. 7a 35m. Sustained climbing up the first three-four bolts in a magnificent position, then easier (6b+) up some average rock. You can avoid the worst rock near the top by pulling on tat. It is also possible to avoid the 7a part by pulling on tat, but ‘well done’ to any non-7a climber who got up pitch 4. Extremely well protected. Another fabulous pitch. Well protected.
P7. 6c 30m. Straight up the pillar on extremely sharp rock. Think cheese-grater. It is good to have enough margin that you don’t have to slap for holds, because that would be horrible. Sustained and interesting climbing.
Les Rois déguisés ED, 7b>6c
The base of the route is at 2520m and the top-out is at around 2770 m asl. The route is in the shade until 12 pm daylight savings time.
 |
| Les rois déguisés traverses the orange pyramide in the middle of the wall |
Topo and description on camp-to-camp. Mussato’s select guidebook Itinéraires d’un grimpeur gâte (tome 2) has a topo and there is also a photo topo on Mussato’s blog
The pitches are extraordinarily sustained in difficulty (≈7a), with very few truly easy parts and the climbing is technical on sharp rock, so count on using a lot of time or a lot of skin to get up. The route takes in a lot of high-quality rock and in the upper parts in outrageous positions as well: you will recognise the high level of mastery in the path found by the first ascensionist.
Overall, we found this route a harder proposition than Ici mieux qu’en face even if that route had possibly a harder crux pitch, at least mentally if not physically.
 |
| 'PF' scratched into the rock. Really. |
The route starts 5 m to the right of Princess de Feu (PF carved at base, hard to spot) and about half a metre to the left of Force et Honneur, when we did it there was a small cairn at the foot of the route. The route climbs up to the impressive pyramid-shape headwall which it traverses mid-height to escape out a gully on the right. After two full-length pitches on blue alpine limestone, the route reaches the yellow-orange sharp rock of the headwall of Pic de l’Aigle. This rock is sharp and has extremely good friction. Lots of gouttes d’eau and small incut footholds, so bring stiff shoes!
We hauled a bag with no issues. The route is steep thorough and generally featureless. We lowered-out the bag on the last three traversing pitches, and as the pitches are short that can easily be done by tying in the bag to the middle of the haul-line.
I have taken the liberty to adjust pitch-grades for realism. The bolting is, however, spot-on for the most part. Well and generously bolted.
Escaping down the route after pitch 8 is an unrealistic prospect, but it should be fine to rap from P7. The belays on P1-P5 are connected by slings but not equipped with quick-links or biners, so to bail you would have to leave some gear.
P1. 7a/b 50m. Sustained vertical climbing with somewhat slippery feet. Shared first bolt with Force et Honneur. Take the left line of bolts. At the top of the pitch traverse hard right across Force… clip a long sling in a bolted belay on the slab and climb down and to the right to another belay lower down on a grass ledge. 17 draws + something for the belay. A superb pitch. Also the hardest pitch on the route.
P2. 6c 50m. Start 2m to the right of the belay, then diagonally up and right. Then a bit zig-zag up various dihedrals and slabs. Bring at least two shoulder-length slings to lessen drag. The belay is on the ledge just up and right of the last bolt to the right of the smaller pillar. (The belay up and to the left is on another route). An interesting pitch.
P3. 7a 25m. Up the steep cracked wall, then diagonally right. Belay on the slab. Great climbing.
P4. 7a 25m. Keep traversing right then straight up. Belay in a big crack on the right.
P5. 7a 30m. Easy up the crack for two bolts, then swing out right. At the last bolt climb up and to the left to the ledge. There are three belays, use the middle one. Good pitch.
P6. 6c/7a 30m. Walk a few m left and climb up an easy crack to a short crux at the overhanging bulge. Do a very morpho reach then traverse right across some very technical terrain to a crack coming up from the right. OK pitch. I used all 179 cm available to me but suspect that the pitch is 7b if you have less.
 |
| J. just above the bulge on P6 |
P7. 7a 25m. Traverse diagonally up right, first with great difficulty then easier.
P8. 6c 20m. Traverse almost horizontally right across Kheops. A bit sparsely bolted pitch on very rough rock that I would not like to swing across, so make sure the second can follow 6c at the end of a long day. Only pitch 2 & 9 are easier.
P9. 6b+ 20m. Up and to the right around the corner, then up the gully, crossing it over to the freestanding pillar that forms it right side, and a belay on top just below the rim. The moves are never very challenging, but the rock quality is. Take care!
Descent: Descent across grass slopes on the back of the wall, first steep then gentler down towards a lake and then back to the army barracks.
Grades, grades, grades. The sharp-eyed reader noticed that my grades above has very little correspondence with the grades offered by the first ascensionists. For the first pitch they offer 6c+ for what is clearly the hardest pitch, with a margin. I pulled on a draw seconding despite some hints from my partner on how to do the crux, and well, I don’t do that sub 7a warm-up or not. The pitch is great, long, sustained with many bolts, but also never easier than 7a+.
I found the long second pitch, which was a nice slab with two harder sections, quite a bit easier than the 6b/c slab on Maelstrom that we did the other day, so I suppose I could suggest a downgrade from 6c to 6b, but I’m loath to do this on an otherwise consistently sandbagged route. I only put in one shoulder length sling, something I came to regret as I had terrible rope drag towards the top. Don’t be like me: put in two or maybe even three long slings to decrease the drag.
The third pitch was supposed to by 6c with a crux high up, but I found the crux to be on the physical steep part in the bottom and the climbing on top quite OK. Anyway, we thought it was closer to 7a than 6c. On pitch four I agree with the 6c+, I was leading and thought it a bit easier than the preceding pitch, maybe because I’m more concentrated on lead so whatever, I suggest 7a, that’s what my second thought.
The fifth pitch was graded 6c+ by the FA party, and I found it of similar difficulty. On camp-to-camp there are comments that a foot-hold broke in 2022 and that it now sports at least a 7a+ crux. For climbers of my height (179, ape +0) 6c/+ is fine for the crux, but for shorter climbers it is surely a bit more difficult. I thought the traverse after the bulge was harder — close to 7a.
 |
| J. on pitch 7 |
Pitch 7 and 8 I can’t say too much about, by this stage the skin on my fingertips was sad and upset so I pulled on a sling once on each pitch to avoid pulling on sharp rock. I though pitch 7 was pretty hard off the belay, and then sustained until the end. As I indicated in the pitch-descriptions, for pitch 8, make sure the second is up to the task of following a sparsely bolted 6c pitch at the end of a long day (or know how to lower out and jug). I think the difficulties were concentrated to around the bolts, but if I recall correctly one of the more difficult moves was just after a bolt?
 |
| Me on pitch 8. It stings. |
The finishing pitch 9 crosses some bad rock, but with care it should be fine.